- Home
- /
- < Back To Researchers
- /
- How To Guide
How To Guide
Apply for PDBP DMR Access
1. Have or Create a Researcher Authentication Service (RAS) Identity
RAS Identity (PIV Card or Login.gov account)
- If you do not have one of the two RAS identities described above, create one here: Login.gov
- Refer to RAS User Guide for instructions
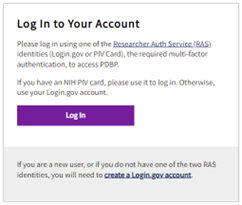
2. Log In to Your Account
Select the Log In button on the PDBP instance Log In page
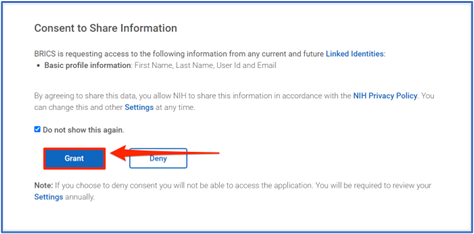
3. Consent to Share Information
When first authenticating through Login.gov, you will need to Grant permission to BRICS to have access to your basic profile information
4. Create Account Request
After logging in using RAS, select the Create Account button.
The Account Management page will load where you will need to complete the following steps to request an account.
- Create a Username
- Provide Contact Information (Name, Affiliated Institution, Institutional Email, Address, and Phone Number)
- Provide a brief description of why you are requesting access to the system
- Electronically sign a Data Use Certification (DUC) agreement
- Decide what you want to do:
- Data Submitter with ProFoRMS (your account includes access to the following modules: Data Dictionary, Data Repository, ProFoRMS, Subject Management)
- Data Submitter without ProFoRMS (your account includes access to the following modules: Data Dictionary, Data Repository, Subject Management)
- Data Accessor (your account includes access to the following modules: Data Dictionary, Data Repository, Meta Study, Query)
- Other (you can request access to the following modules: DataDictionary, Data Repository, Meta Study, ProFoRMS, Query, Query Tool API, Subject Management)
- Data Submitter with ProFoRMS (your account includes access to the following modules: Data Dictionary, Data Repository, ProFoRMS, Subject Management)
- Determine what Data Access you would like:
- PDBP Genomics & Neuroimaging – This group contains users who have "Read" permissions to Genomics and Neuroimaging data.
- Complete & upload a signed DUA. The DUA must be co-signed by your institutional signing official (An Institutional Business Official or signing official is generally a senior official at an institution who may be credentialed through NIH eRA Commons system, and is authorized to enter the institution into a legally binding contract and sign on behalf of an investigator who has submitted data or a data access request to NIH.)
- Complete & upload a signed DUA. The DUA must be co-signed by your institutional signing official (An Institutional Business Official or signing official is generally a senior official at an institution who may be credentialed through NIH eRA Commons system, and is authorized to enter the institution into a legally binding contract and sign on behalf of an investigator who has submitted data or a data access request to NIH.)
- PDBP Biosample Access – Grants access to the PDBP biosample catalog and allows user to create biosample order (must have PD BRAC approval prior to sample order).
- PDBP Consortium – This group contains users who have full access to view and download embargoed data.
- PDBP Clinical Coordinators – This group contains users who will be entering data into ProFoRMS
- PDBP Data Only Users – This group contains users who only have access to publicly shared data.
- PDBP Genomics & Neuroimaging – This group contains users who have "Read" permissions to Genomics and Neuroimaging data.
- Submit your request
- Users will have access to the Account Management module before approval and may log back in to upload any additional supporting documentation
Request Account Renewal
- Log In to your account
- Navigate to the Account Management module
- Select Edit Profile in the right-hand corner
- Select the Request Account Renewal tab
- Scroll to the bottom of the page and upload any renewal documents (e.g., Genomics & Neuroimaging Data Use Agreement)
- Select the documents check box then select Save & Renew Privileges
How to request access to the DMR
Step 1: Determine your permissions
Depending on your role in a research team, the permissions you will need will be different. Below are the six modules of PDBP DMR that you need to understand to determine what account type you need to apply for.
Global Unique Identifier (GUID)
Provides common definitions so data is consistently captured and recorded across PDBP studies
Data Dictionary
Provides common definitions so data is consistently captured and recorded across PDBP studies
Protocol and Forms Research Management System (ProFoRMS)
Manage studies, subjects, and forms, collect data and run reports and queries
Data Submission
Part of the ProFoRMS system that provides electronic data entry forms supporting NINDS CDEs and unique data elements
Data Validation
Validate data against the data dictionary, upload validated data to the DMR database
Data Query
Search PDBP DMR database by study, clinical form and/or data element
Meta Study
Enables a researcher to expand their research through creation of a secondary study that includes their data and data that is available through the PDBP
Medical Image Processing, Analysis, and Visualization (MIPAV)
Prepares image files for submission and validation to the PDBP DMR
Step 2: Determine your account type
There are two types of accounts: data submission and data access. Your permissions determine which account type you should request. If your permissions span both account types, you can request access to both. Let’s take a closer look at which permissions go with which account type.
Data Submission
If you need access to one or more of the following modules, you want to apply for a data submission account.
Global Unique Identifier
Data Dictionary
Protocol and Forms Research Management System (ProFoRMS)
Data Submission
Data Access
If you need access to one or more of the following modules, you want to apply for a data access account.
Data Submission
Data Query
Meta Study
Step 3: Get account approval
If your account is approved, you will receive a notice from the DMR-Ops-team instructing you to login within 48 hours to ensure your account remains activated.
How to submit data to the DMR
To submit data through the PDBP DMR, the researcher or healthcare professional will need to establish a PDBP DMR account. All data submitted to the PDBP DMR is de-identified, and this is accomplished through the generation of a global unique identifier (GUID) for each PDBP participant. To enable broad sharing of both de-identified clinical data and biospecimen resources, participants must be properly consented.
Step 1: Access and Log into the DMR
A data submission request form and DMR Data Use Certificate must be completed, signed, and approved.
Step 2: Create a study
Creating and defining a study in the data repository is the first step in the process to submit data. Coordinate with PDBP DMR Operations team at PDBP-OPS@mail.nih.gov
Data Repository
The Data Repository is where study information and research data is stored and organized. Researchers and teams can define study roles, study site locations, funding source information, associate form structure and data collection instruments, and manage study access permissions.
Data Validation
The data validation tool is used to ensure data quality. Data submitted from ProFoRMS or uploaded directly via the submission tool writes data to your study in the repository
Step 3: Collect data through ProFoRMS
The Protocol and Forms Research Management System (ProFoRMS) is the primary data collection resource used by the DMR. ProFoRMS allows for the management of studies, subjects, forms, data collection, and reporting.
Create a Protocol
Create and link a protocol in ProFoRMS to a study in the Data Repository. Manage subjects, create visit types, and collect patient data.
Manage Subjects
View registered subjects, search for subjects, and schedule visits for data collection. In order to create a subject in ProFoRMS, you will need to input and associate a Global Unique Identifier (GUID) for each subject.
Create and organize visits
Create and define visit types and associate form structures with visits for data collection.
Please ensure you reference the required list of Clinical Assessments for projects submitting data to the DMR: Clinical Assessments - Core Forms
Collect Data
Perform data collection directly in ProFoRMS using electronic data entry forms supporting NINDS CDEs and unique data elements.
Request biospecimens from NINDS
- Request a new account with the PDBP DMR (if you don't already have one)
- Login to the DMR using your account and select the Query module
- Once in the Query module - select the NINDS Biorepository Sample Catalog and any other form structure (i.e. MDS-UPDRS) you would like to use to help refine your sample selection
- Sort biosamples by any of the selection criteria (select criteria tab) -subject information, sample information, quality control
- Select a biosample by clicking on the corresponding "system assigned ID for an orderable biosample"
- When you have finished your biosample(s) selection, go to the Account Management tab and select "Order Manager"
- At this stage you may further refine your Biomaterials Queue prior to selecting the biosample(s). Once your review is complete and biosamples selected, create your order by hitting the "add to order" button.
- A new order alert will appear. Select this notification (the notification will be seen above the "add to order" button).
- You will now be asked to upload 2 documents; 1) your BRAC application and 2) supporting documentation, i.e. upload a signed (investigator and institutional official) BioSEND Material Transfer Agreement for Biospecimens.
- Provide a shipping address and either save and exit or save and submit the order.
- Comments and decisions from the NINDS PDBP Biospecimen Resource Acquisition Committee (BRAC) will be communicated directly with the requestor through email correspondence and through the Order Manager under "Admin Orders".
- If your biospecimen(s) request is approved, the NINDS Repository staff will work with you to organize the receipt of the biospecimen(s).
- For further details on biospecimen ordering, please click here to assist you in creating an order for the NINDS Biorepository through the PDBP DMR.
Transition from Java to OpenJDK
The DMR utilizes Java-based web start applications such as the Download Tool and Submission Tool. The current Java-based web start versions will no longer be supported by the vendor (Oracle). As a substitute, the DMR has integrated the open source version of Java, known as OpenJDK and IcedTea. OpenJDK is a fully supported alternative to Java and IcedTea is the open source alternative to web starts (JNLP files). When installed, users can continue using the DMR Download Tool and Submission Tool, without restriction. The following instructions detail how to install OpenJDK and IcedTea.
IMPORTANT:
(1) Removal of Java is an organizational decision and varies by user group. Users are strongly advised to consult with their internal IT-Departments for additional information prior to attempting the installation.
(2) User's need to have Administrative permissions to their computers in order to install OpenJDK and IcedTea.
Uninstalling Oracle Java
Instructions:
Reference instructions below for how to uninstall Oracle Java. Oracle Java and OpenJDK cannot run in parallel.
- Download and run Oracle's removal tool, which is available for both PC and Mac: https://www.java.com/en/download/uninstalltool.jsp
- In Windows, the system path will need to be cleared of any old Oracle Java entries
- Press the Window key
- Right-click on the "Computer" button/entry
- Choose the "Properties" option
- Click on the "Advanced system settings" item or link in the left panel
- Enter in your admin or AA account credentials, if you are asked for them
- Click the "Environment Variables..." button
- In the "System variables" section scroll down to and select the "Path" entry
- Double-click the selected entry or click on the "Edit..." button
- In the "Variable value:" text field remove all entries referring to Oracle Java install paths (i.e. the "C:\ProgramData\Oracle\Java\javapath" entry that is usually the first entry of the string)
- Click the "OK" button in the "Edit System Variable", "Environment Variables", and "System Properties" windows
Alternative Instructions (Manual):
Windows
- Follow the steps on the following page: https://www.java.com/en/download/help/uninstall_java.xml
- Press the Window key
- Right-click on the "Computer" button/entry
- Choose the "Properties" option
- Click on the "Advanced system settings" item or link in the left panel
- Enter in your admin or AA account credentials, if you are asked for them
- Click the "Environment Variables..." button
- In the "System variables" section scroll down to and select the "Path" entry
- Double-click the selected entry or click on the "Edit..." button
- In the "Variable value:" text field remove all entries referring to Oracle Java install paths (i.e. the "C:\ProgramData\Oracle\Java\javapath" entry that is usually the first entry of the string)
- Click the "OK" button in the "Edit System Variable", "Environment Variables", and "System Properties" windows
Mac
https://www.java.com/en/download/help/mac_uninstall_java.xml
Installing OpenJDK
Installing on Windows
- Go to https://adoptopenjdk.net/.
- Choose the "OpenJDK 8 (LTS)" option, which should be selected by default
- Choose which JVM you would like to use (see description above for more information on what to choose)
- Click the "Latest release" button to download the MSI installer file
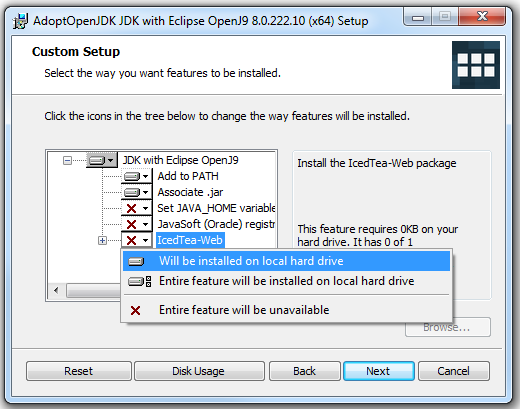
- Run the downloaded MSI file, and proceed through the install wizard until the "Custom Setup" window appears (see below)
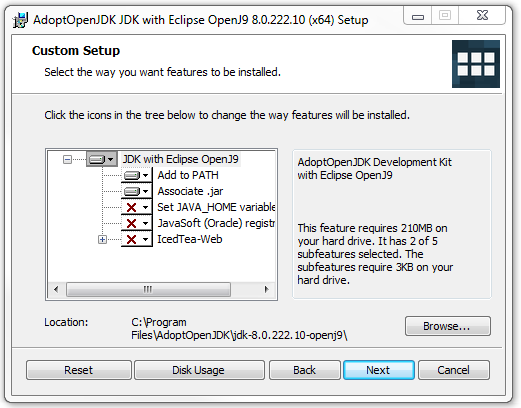
- Check the status of the "Set JAVA_HOME variable" option, which is shown in the picture above. If there is a red X set in that option (as pictured above), please continue to the next step. Otherwise, skip the next step
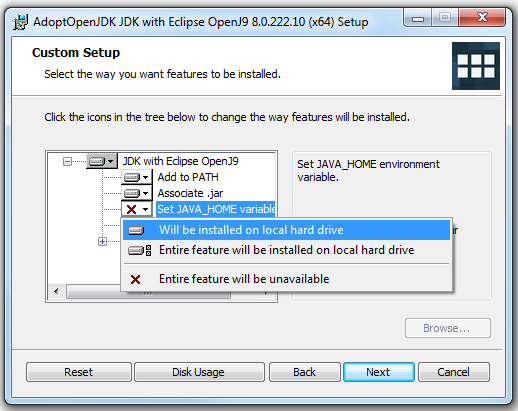
- Click the red X icon next to the "Set JAVA_HOME variable" option, then choose the "Will be installed on local hard drive" option (as pictured below)
- Click the status of the "IcedTea-Web" option. If there is a red X set in that option, please continue to the next step. Otherwise, skip the next step
- Click on the red X icon next to the "IcedTea-Web" option, then choose the "Will be installed on local hard drive" option (as pictured below)
- Once the red Xs has changed to a drive icons for both the JAVA_HOME and IcedTea options, the final "Custom Setup" window should look similar to the picture below:
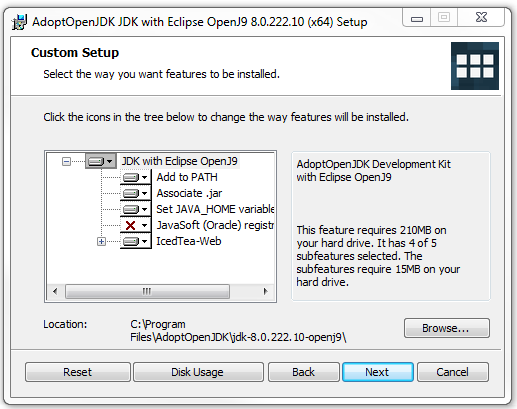
- Click on the "Next" button, and continue with the installation
- Verify that the new OpenJDK release is configured correctly by opening a command prompt window and running: java -version. The command output should correspond with the name of the file downloaded in step 4
Launching Web Starts with IcedTea
Once the OpenJDK install described above finishes, double-clicking on JNLP (Web Start) files should launch IcedTea's web start launcher. If it does not, and if a "Open with" window appears or if an error message is displayed. The JNLP files will need to be re-associated with the "javaws.exe" program included with the AdoptOpenJDK installer. This may also happen if an older version of OpenJDK is uninstalled from your system. The JNLP files can be re-associated by following the directions below:
- Right-click on the JNLP file that you would like to launch
- Click on the "Open with..." option. A window like the following should open:
- Click on the "Browse..." button (highlighted in the picture above)
- In the file chooser window, navigate to the "%JAVA_HOME%\bin" folder, then select the "javaws.exe" file. See picture below:
- Once the "javaws.exe" file is found and selected, click on the "Open" button
- You will be taken back the first "Open with" window, but this time a "javaws.exe" option is available and selected
- With the "javaws.exe" option selected, put a check mark in the "Always use the selected program to open this kind of file" checkbox (highlighted in the picture below)
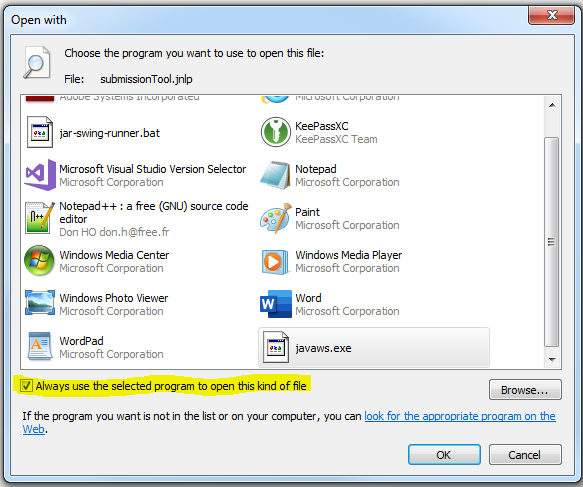
- Click on the "OK" button, and the IcedTea web start launcher should startup
Installing on macOS
- Install Homebrew with the following sub-steps, if needed:
- Open Terminal.app
- If you have an AA account, you will have to switch to that account with the following command:
- su - [aa_account_username]
- su - [aa_account_username]
- Run the install command on Homebrew's homepage
- Open Terminal.app, if not already opened
- If you have an AA account, run the command in step 1b
- In Terminal, run the following commands:
- brew tap AdoptOpenJDK/openjdk
- brew cask install adoptopenjdk8
- Check your Java version with the "java -version" command
NOTE: The Java/JDK home directory is "/Library/Java/JavaVirtualMachines/adoptopenjdk-8.jdk/Contents/Home". Keep that in mind if you need to set any JAVA_HOME variables.
Query Tool Module Tutorial
How to Upload Neuroimaging Data
Detailed instructions coming soon!
GUID Module Tutorial
Video instructions coming soon!